Category Archives: blog

Traveling Library with Guest Writer Dave Roche

pastedGraphic.png

If the kids can’t go to the library, the library has to go to the kids

Written by Dave Roche
June 07, 2021

This was a year of building. This was a year of re-imagining, experimenting, listening, problem solving, and creating. For those of us fortunate enough to make it through this year shaken, bruised, but still smiling, it was our obligation to share our hope with those who had run out. It was our duty to ease the burden of those about to break. This was not a time for sifting through the ashes of the year hoping to find something salvageable from the old normal. This was a time to create something better, expect something more, and work like you’ve never worked before to get it.

And the talk of learning loss? This year was a Rorschach test; you saw what you expected to see. I saw students navigate multiple online tools. I saw students create websites. I saw students problem solve tech issues. I saw students learn how to manage their time, stick to a schedule, and keep their classwork organized far beyond what I was ever able to teach. I watched as students learned to advocate for themselves, learned how to ask for support, and support each other. I watched as day by day they became more resilient and more confident. OK, they might not be able to identify consonance in a poem, but they made incredible gains in executive functioning, creativity, technological know-how, and emotional awareness.

This was a year where I tried to let the students tell me what they need and I would provide the resources. And one thing I noticed students needed was books. Many of my students did not have books at home, and those who had books had already read them. Learning remotely, they had no classroom or school libraries to borrow from, and going to public libraries was probably questionable for families who were concerned about exposure to the virus (or who didn’t have the time or energy to go to the library.) As a reading teacher, the one thing I want more than anything else is for my kids to be reading all the time. So if kids can’t get to our books, then we should get our books to kids.

That’s why I decided to make a bookmobile. Now, some people might think not having a car or even a driver’s license would be a major, maybe insurmountable hurdle, to starting a bookmobile. I wasn’t going to let that stop me. I have a bike.

I bought a sturdy bike trailer, one capable of carrying 100 pounds. This was also about the limit my legs could pedal. I mean, in my 20’s I could have biked the whole Independence Park Regional Branch around town, but I’ve been sitting in front of a computer for 10+ hours a day for the past 15 months. I’m not in my best biking shape.

Next I had to build a bookshelf, something I could fold up so it wouldn’t tip over while riding. I asked my father for help. To say he did 90% of the work might be underestimating.

pastedGraphic_1.pngpastedGraphic_2.png

Then it was my favorite part of planning: buying books. I put in a $350 order to Women and Children First (my favorite bookshop in Chicago) and a $150 order to Scholastic. I love buying books, but the joy I get from buying a ton of books knowing I will get reimbursed for them? OFF THE CHARTS. Graphic novels, poetry, historical fiction, nonfiction… I even got a cookbook. As this was a family literacy event, I wanted to make sure I had books for parents as well. I took a few titles from my personal collection and added them to the shelves.

For my debut, my school’s music teacher was nice enough to let me set up at her outdoor, socially-distanced production of Little Shop of Horrors. I gave a little speech about it before the show, and after the show several families came by and checked out books. They seemed to really like the idea.

pastedGraphic_3.pngpastedGraphic_4.png

First borrowers                   

But the purpose of the bookmobile is to take the books to students, not to have them come to me. The principal let me write up a blurb about the bookmobile for the weekly parent newsletter. Several families were interested. I got their information, made up a Google map of their houses, and planned my route.

For some reason I chose a 90° day to make my first trip out to families’ houses with the bookmobile. It went better than I expected! Kids were happy to get some new books, and I think they got a kick out of seeing one of their teachers out in the real world. Parents loved the idea and one checked out a book for herself. And one of the really nice things is, I’ve already had several parents and a few teachers offer to donate books. I might need to buy another bike trailer and take on an intern!

pastedGraphic_5.png

First trip to a family’s house

I intend to take the bookmobile out throughout the summer. The goal is to get more parents interested and have a set route I cover every two or three weeks, picking up old books and lending out new ones.

Every aspect of the bookmobile has brought me joy. And even if I don’t end up on the news like people keep telling me, I’m glad that good books are making their way into the hands of good readers.

The Magic Moment in Learning to Read

           By Featured Writer Steve Zemelman

Do you remember what it was like learning to read? Some people do, I’ve found, but I don’t. All I can recall was sitting in the SLOW reading group, distracted from Dick and Jane (yes, Dick and Jane. That’s how old I am.) because I wondered why the other group was ahead of us. It wasn’t fair.

But a few weeks ago I chanced to witness the moment when my grandson, Gil, suddenly switched from figuring out word and letter sounds to joyously reading me a story. He’s in second grade and reading had been challenging for him. It wasn’t clear why, because he has a steel-trap memory and a large and abstract vocabulary.

So it happened that during the pandemic, my highly active grandson’s impatience with online learning led his parents to home-school him for the year. And to give them some relief from attending to him, each grandparent took a day of the week to spend 45 minutes or so in the morning conducting an activity with him. My day was Tues. We communicated via Skype between me in Chicago and Gil in Greenfield Massachusetts. 

After some weeks I was running out of engaging and creative ideas. He’d tired of his dinosaur chart, and creating small spit-ball catapults had proven more frustrating than I had anticipated, so we were spending more time just chatting. On the morning of Mar. 16, 2021, to be exact, he came online and announced, “Papa Z, I’m going to read to you.” He launched right into four chapters of one of the Dog Man graphic novels, laughing and commenting as he went. He needed help with just a couple of words, though usually not the more complex ones. And when he was finished, he declared to his dad, who was working at his desk nearby, “Dad, I just read four chapters of Dog Man!”

We literacy educators debate endlessly about the right way to teach kids to read. But how often do we get to see that magic right at the moment when it kicks in – and with a child we deeply love? I’m truly a privileged man. And don’t tell me that great learning can’t happen at home during a pandemic lock-down.

Tips and Tricks for Remote Teaching and Learning

Many of us are teaching (or learning) remotely, constantly on the lookout for better ways to engage with the content. If we can avoid tripping over technology before our class, department, or professional development meeting even begins, we can more successfully accomplish our goal of interacting and learning together.  Here are tips and tricks to consider before starting your Zoom meeting.

Before Meeting Tips

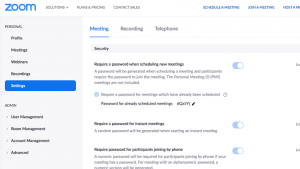
Check settings (these cannot be changed once a meeting is started).

Go into your settings and choose “Meeting.”

Screenshot of meeting settings

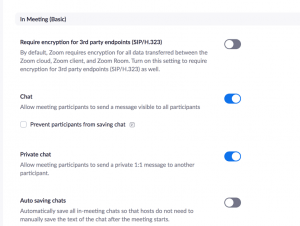
Scroll down to In Meeting (Basic). Choose your chat settings.  

Screenshot of chat settings

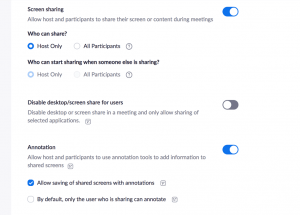
Continue to scroll down.  Choose your sharing settings.  Depending on your activities, you may want to allow participants to share their screens. 

Screenshot of sharing screens settings

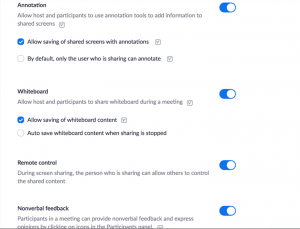
Continue to scroll down to the Annotation and Whiteboard settings.  If you want participants to be able to annotate or contribute to a whiteboard, make sure those settings are turned on.  Also turn on the nonverbal feedback.

Screenshot of whiteboard and annotation settings

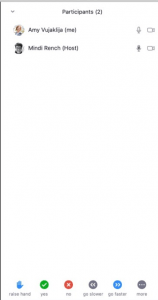
If you look at the bottom of the participants window pictured below, you can see the nonverbal feedback options.

Screenshot of nonverbal feedback settings

Continue scrolling. Turn on your breakout room settings.

Screenshot of breakout rooms settings

A few minutes attention working behind the scenes before a meeting creates the options for interacting with each other in large or small groups, annotating documents together, sharing our screens, and providing feedback to each other nonverbally.  Happy meeting!

Carousel Brainstorming: F2F and Virtual

Writing to Learn into the Content

Using writing to learn activities to think through content is useful for beginning units, accessing prior knowledge, and making predictions.  Consider the carousel brainstorming method for engaging students in particular questions about the topic.  See how you can adapt this activity for both face-to-face and virtual settings.

Carousel Brainstorming: Face-to-Face

  1. Write five or six statements or questions about the topic being studied – each one at the top of a separate piece of chart paper.  
  2. Post charts with statements or questions around the room.
  3. Option 1: Students in small groups rotate among the posted sheets, and each group spends several minutes at a sheet to discuss the topic and then write a group brainstorm or response on the chart paper (and sign it). 
  4. Option 2: Students individually write comments on chart paper as written conversations.  If approaching the task as an individual activity, chart paper should be placed on tables to be more easily accessible by multiple students at once.
  5. At your signal, the groups rotate to the next chart.
  6. Repeat until all have visited all the charts.
  7. Allow a few minutes for a gallery walk for people to see all the ideas that have been shared.  

As with other brainstorming, use the lists as you are working through the unit, to highlight big ideas and themes, answer questions, or clarify misconceptions.

Carousel brainstorming in face-to-face classroom or conference environment invites both written and verbal conversation. 

Carousel Brainstorming: Virtual 

A platform such as Padlet.com provides a collaborative virtual bulletin board.  On Padlet, the “shelf” template allows you to title columns with statements or questions.

  1. Make a Padlet board* with a template such as “shelf.”
  2. Write 5-6 statements or questions, each on a different column in the Padlet board.
  3. Students read and respond to all of the statements and questions in a set amount of time.
  4. During the next time frame, students may select one statement or question for their focus.
  5. Student read all the posts made in this focus column.
  6. Invite students to comment on a few posts that particularly connected to them.
  7. Extend this activity by asking students to summarize thoughts in a journal entry.
  8. When using the carousel writing to learn activity for moving into the content, be sure to return to the activity at the end of the unit or topic.  Using new chart paper or Padlet allows for comparisons to students’ original thinking.  You can also clear the original Padlet, but be sure to save the original as a PDF!

Happy thinking and writing!

*Note: Carefully consider the settings for the age/grade level.  Padlet allows for anonymous posts, but the settings can be changed to require authors’ names and allow comments from other participants.  Settings also provide the option to moderate posts and filter for profanity.  Virtual participation often results in more boldness than face-to-face classroom interactions, which are both advantages and disadvantages to the digital platform.

Resources provided by the Illinois Writing Project Basic 30 Team.  Become part of our community – see our upcoming events here.  Check out IWP on Twitter!

Writing to Learn: Two Times Two

Writing to learn removes barriers that formal assessment might place in the way of creative thought and exploration.  Writing to learn activities are spontaneous, short, exploratory, expressive, informal, personal, unedited, and ungraded. This is much like what we expect brainstorming or pre-writing to be.  We can use writing to explore and muddle through complicated new ideas at both pre-writing and writing beyond the content.

Two tools discussed here are clustering and concept mapping.

Clustering

Clustering is a form of writing-to-learn using a kind of right-brained outlining first described by Gabrielle Rico in her book Writing The Natural Way (Tarcher, 1985).

  • Start with a key concept, term, or name in a circle at the center of a page.
  • Draw spokes radiating out from the center circle.
  • Through free-association, jot down all the ideas in circles arrayed at the end of the spokes, in whatever pattern “seems right.”
  • Add more spokes as ideas lead to further thoughts and connections.

For Pre-Writing.  For creative writing, this topic might be a self-selected, perhaps one from a previous writing.  As an entry point into a lesson, it might be a concept suggested by the instructor.  Writers can then use this diagram as an outline or list of subtopics they wish to cover. Then, they can use scaffolding that leads to the issue that they really want to focus on. It can be a guide to a group of issues related to one another in one region of the diagram.

For Writing Beyond the Content.  Clustering helps writers see how all the main ideas and details in a unit of study are connected together. In addition, clustering often reveals unrecognized connections and relationships. group writing

Concept Mapping  

Concept mapping, originating with Joseph Novak and Alberto J. Cañas, depends on relevant relationships among the ideas on the page.  This method is especially helpful for writers who are trying to learn and write about larger subject areas.

  • Begin with a list of subtopics, cause-effect relationships, or whatever aspects of their topics are relevant.
  • Add words and phrases to the list, drawing connections to other items.
  • Label lines (connections) to explain how the two items are related.

For Pre-Writing.  The relationships identified among the topics generated in a concept mapping session can springboard a writer into inquiry (What other connections might there be? Why are these two items connected?) or creative writing (What do I have to say about these connections?)

For Writing Beyond the Content.  Identifying relationships among concepts moves writers beyond the day’s lesson or week’s mini-unit.  Encouraging writers to think about the crossovers in their lives (other content areas, extra-curricular, family, community, and world) enhances understanding of the concept.  Fire up those synapses!

Going Digital A Google search for digital brainstorming or mind mapping tools will populate your screen with countless options.  I have had success with digital tools Padlet or Popplet  because they are so easy to use.

Resources provided by the Illinois Writing Project Basic 30 Team. Don’t forget to check out the IWP on Twitter!

Writing to Learn

Writing is more than just a language art.  It is a means of engaging and exploring subject matter more effectively.  Over the next weeks, we will share writing-to-learn activities that reach across many subject fields and teaching styles. As a result, we are helping students move into, through, and beyond the content of the curriculum.  However, we must first lay some groundwork.

writing

Writing to learn activities differ from formal expository or creative writing assignments in important ways.  They are…

  • SPONTANEOUS vs.  planned
  • SHORT vs. lengthy
  • EXPLORATORY vs. authoritative
  • EXPRESSIVE vs. transactional
  • INFORMAL vs. formal
  • PERSONAL vs. audience-centered
  • UNEDITED vs. polished
  • UNGRADED vs. graded

Writing as a tool for learning gives extra leverage to thinking.  Consequently, it works best when we personalize the language.  We invite writers to be informal, colloquial, and personal — as close as possible to everyday speech.  We should invite experimentation and risk-taking. Never mind proofreading and grading.  These results are used in class for ongoing exploration of content.

This week, here is a nugget for writing through the content to try in either face-to-face or online virtual class meetings.

Take a writing break.  Too often in presentations, teachers feel a need to plunge on and “cover the material.” (My online video lectures – guilty!)  In fact, students would benefit greatly from an occasional pause for them to write and reflect on what is being taught.  Some possible focusing questions might be these:

  • What are you thinking right now?
  • Where have you gone so far?
  • What questions are bugging you?

This break provides students a chance to consolidate what has been learned and prepare to go on.  

Resources provided by the Illinois Writing Project Basic 30 Team. Don’t forget to check out the IWP on Twitter!

Visualizing Your Writing

Using visualizing as a brainstorming tool can generate amazing ideas for writing.  With four steps, participants can spring into writing, hurdling over those stubborn blocks that can sometimes halt us in our writing tracks.  The basic structure of classroom visualization or guided imagery has four steps: choice, relaxation, visualization, and return.  Consider the following guide through this brainstorming process.
  1. Choice:  Guide the writers in selecting a particular remembered or imaginary scene.  Ask questions such as, “What is a memory that makes you smile?” or “Where is a place you treasured growing up?”  You can take this in directions of the imagination, as well, with questions about favorite settings in books (Hogwarts, anyone?).
  2. Relaxation:  Help writers relax by establishing a mood for the exercise.  Eyes may close.  Writers should breathe calmly.  Lower your own voice to a clear, gentle tone.
  3. Visualization:  Provide a series of “contentless” prompts based on the guidance during the choice step.  Ask questions such as, “Look to your left — what do you see there?” “What is the sun doing?” “What does the air feel like?” “Who else is with you?” and others.
  4. Return:  Ask writers to gather their details from the visualized scene.  Bring them back to the present time.
imagination Consider using this technique to search memories for details about past experiences, reconstruct scenes from stories (or combinations of stories), or create new, imaginative experiences. You may be surprised what you can come up with! Because guided imagery works so well, evoking vivid details which people have often forgotten, and because it requires some rather carefully worked out methods, Zemelman and Daniels wrote a whole chapter about this procedure in A Community of Writers (Zemelman and Daniels, Heineman, 1988.) Credit goes to Steve Zemelman, Smokey Daniels, and the Illinois Writing Project Basic 30 team for this content. Check us out on Twitter!

Modifying the Writing Marathon

The writing marathon has become a mainstay in many Writing Project summer institutes, workshops, and conferences.  The goal of a writing marathon is to weave together movement and writing.  A writing marathon might have a theme or purpose for visiting particular sites.  For example, in 2011 during my Louisville Writing Project summer institute experience, we drove to Civil Rights landmarks. Our writers learned about the events and people they represented, and then reflected and wrote.  Similarly, at several conferences and workshops, I have seen hosts conduct walking and writing tours of their home cities. running So how might the writing marathon be modified for the classroom or home when mobility is limited?  When conducting a writing marathon in a limited space such as around the classroom or home, consider guiding participants to find inspiring spaces or objects.  Lately, scavenger hunts have become popular activities.  Similarly, writing can be inspired by reflections about the simplest objects in our local spaces – birds in flight, spring awakening, cracks in sidewalks (where did old wives’ tales come from, anyway?).

Writing Guidelines

Modifying the recommendations of “A Guide for Writing Marathon Leaders” posted by the National Writing Project can help.
  1. Treat the participants as writers.  Be a writer.
  2. Keep the marathon focused on the writing.  Sightseeing, tour guide speaking, and socializing take backseat.
  3. Conduct as many rounds of writing as possible.  The walking, talking, reading, or interacting should spur writing, not detract from it.
  4. Write, read your writing to others, and say only “thank you” after each reading (Natalie Goldberg, whose book Writing Down the Bones).
  5. Say, “I am a writer.”  Really.  Do it.
  6. Keep groups small.  In the case of a classroom, 3-4 students writing together is appropriate.  At home, write alongside your child or children.  Be partners in writing.
  7. Remember that writing happens even when we’re not writing.  The moment the writing marathon has begun with introductions of participants as writers, the mindset has shifted to positive productivity.
  8. Select an appropriate closure.  It might be a select reading of the marathon’s writings.  Stay flexible.  Participants might not be ready to stop writing at the same time.
  9. Remember: choice, community, diversity, spontaneity, serendipity, discovery.
  10. Write for the experience, not the product.
As stated in the Guide, “A writing marathon is all about the writing and writer. Say it again. It is all about the writing and writer. And writing is enjoyable, especially when you do not have to do it for anyone else but yourself, when no one will criticize it, when you give it plenty of time, and when you allow yourself to write about things you did not expect.”  Also see this handout for more tips. Finally, share your writing marathon experiences as participants and leaders as comments to this post.  We look forward to hearing from you!

Writing an Apology Poem: What Else Can We Do with a Direct Address?

Increasing the focus on clear communication moves writing,

speaking, and listening to the center of our teaching. What are ways other than speech and argument essay writing can we teach students to address an audience? How do we foreground students’ creativity? Furthermore, what are ways other than speech and argument essay writing can we teach students to address an audience? Also, how do we foreground students’ creativity?

sorry Some poems take the form of “direct address”—that is, the speaker in the poem talks directly to a specific person. Poems can be used to develop initial reactions to situations or current events or as extensions of other types of writing.

An apology poem uses direct address to apologize for something the speaker has done or said. One of the most famous examples is William Carlos Williams’ “This Is Just to Say.” The following activity description can guide students through close reading, analyzing, creative brainstorming, purposeful drafting, language revising, and peer collaborating.

Possible script for writing an apology poem:

  • Read Williams’ poem.
I have eaten the plums that were in the icebox and which you were probably saving for breakfast Forgive me they were delicious so sweet and so cold
  • Decide for yourself whether the speaker is actually sorry for what he has done.
  • Think of a situation like this from your own life.  Have you ever been forced to apologize when you didn’t really mean it? Try to recall two or three examples of times like this from your own experience.
  • For each example, write a very short description of what you have done (the action).
  • Think about details of sense: taste, touch, sound, sight, or smell. Give your readers a clear idea of what the action felt like for you.
  • Choose one of your examples to mine very short lines for your apology poem in a similar format to the one by Williams. Probably no punctuation is necessary.
  • Finally, use “This is just to say” as your first line if you wish. If you want, you can also include the words “Forgive me” in the last stanza of your poem.

Experiment with different ways to make line breaks or stanza breaks in order to get the effect that you want. Remember, there is no wrong way to write an apology poem. When William Carlos Williams wrote “This Is Just to Say,” no one had ever created a poem quite like this before. You can borrow his format if you want, or you can create something totally new.

Give the activity a try and post a comment or tweet a link to your draft! Better yet, come show it to us in person at our mini-conference on March 14th! You are welcome to share this post. Consider including hashtags such as #ilwrites, #teachwriting, #writing, as well as your own chat groups.

Four-Square Activity for Brainstorming

Returning to the Classroom

Classroom writing after any departure from routine is certainly challenging, particularly following winter and summer breaks. Tapping into personal experiences may be the way to re-engage students (and teachers) in the return to routine writing.

This four-square activity can be used for brainstorming details about an event in one’s life. Structuring the paper into four quadrants chunks the writing into manageable quantities. This activity enables writers to recall details to help paint a vivid word-picture of an event that the person has experienced. It is not necessarily intended for an external political or social event (unless that event itself had an immediate effect on the person). brainstorming

The activity script can be something like this:

  • Identify an important event that you have experienced.
  • On a full-sized sheet of paper, draw a vertical and horizontal line to divide the sheet into four equal rectangles.
  • Use each square to brainstorm a list of words and phrases about one of the following aspects of the event:
    • Visuals: place, others who were there, description of the place
    • Emotions: how you felt before, during and after the event
    • Action: the time or timing, plus words and phrases that describe how the event took place
    • Dialogues: quotes, words or phrases from the event
  • Turn and talk with a partner. See if that leads to any additional details.
  • On the reverse of this paper, quick write for 5-7 minutes. Write whatever you are thinking about the event to get as much down as possible. Do not worry about format, punctuation or spelling. Get your thoughts and memories onto the page.
  • Decide what type of writing you would like to do: poem, narrative, letter to a friend, announcement, memoir.
  • Draft the piece OR outline what you plan to do. People can share when ready.

Give the activity a try and post a comment or tweet a link to your draft! Better yet, come show it to us in person at our mini-conference on March 14th! You are welcome to share this post. Consider including hashtags such as #ilwrites, #teachwriting, #writing, as well as your own chat groups.